Monday 3 June 2019

June Rivervalley Block of the Month

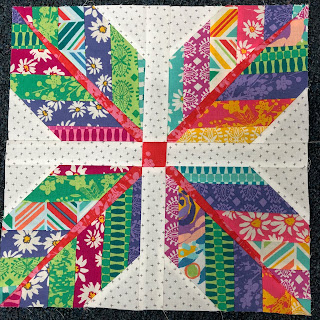
June is here so this will be our last block for the year.


This block uses my favourite ruler, the Tri-Recs.  Not to worry if you don't have the ruler as I'll give you another option to make the block.

To start you will need a 3 1/2" strip of both background and feature fabric.  Also, a 6 1/2" square of background fabric.


From the feature fabric strip cut eight units using the Tri part of the ruler set.


Fold the background strip with wrong sides together and cut eight pairs using the Recs part of the ruler.


Line the pieces up as shown.


Sew the background piece to one side and then press the seam towards the background piece.


Sew the other side on and you have one Tri-Recs unit.  Make eight of these units.  From the background strip cut four 3 1/2" squares.


Sew two units together hopefully lining up your points a little better than I did.  Make four sets.


Lay out all the pieces of the block as shown and sew together.


I love the effect of curves without having sewn a curve.

If you don't have the ruler you can draw up the units on paper and foundation paper piece.


Draw a 3" square and add a mark at the top centre of the square.


Add lines from the corners as shown.


Add 1/4" seam allowance and number as shown.  Paper foundation piece to make the same units as the Tri-Recs ruler.


These two blocks are Paulette's interpretation of my rather vague instructions.  Love her colour choices on both of these.

Have fun and thanks for playing along!

Monday 6 May 2019

May Rivervalley Block of the Month

This months block is brought to us by Paulette.  First up is a traditionally pieced block.  Scroll down for a few modern interpretations.


I was sent lovely images of the process, but unfortunately they wouldn't work on the blogger platform.  So you get written instructions only.

Cut a 10 1/2" piece of background fabric.  From the hashtag fabric cut two 2" x 10 1/2" pieces and two 2" x 12 1/2" pieces.

Cut the background fabric into three pieces 3 1/2" x 10 1/2".

Sew the shorter hashtag pieces between the background rectangles.  Turn and cut into 3 1/2" x 12 1/2" pieces.

Sew the remaining hashtag strips between the rectangles.  Throughout the block press the seams towards the hashtag fabric.

Now for a few more blocks from Paulette.


The process for these blocks was explained at the meeting.


For my version I started with a 10" block.  I cut it into 3 1/2" strips on the outer edges and a 3" strip in the centre.  I added 2" x 10" hashtag fabric strips between the rectangles.


I turned the block and then slashed at an angle as shown.  The second cut is the same angle, 3" away.


I sewed the hashtag fabric cut into 2' x 12" strips between the pieces.  I then squared it up to 10 1/2" and added a 1 1/2" sashing around the block to bring it up to 12 1/2".

Monday 1 April 2019

April Rivervalley Block of the Month

This month's block is brought to us by Carol.  Carol wants everyone to let their creativity take over so that they can make a unique block.

To start, pick a background fabric and cut a 13 inch square.  After your appliqué is done, you can trim it to 12 1/2.

Decide how many and what size you want your circles to be.  Audition circles by using a paper pattern.


I decided to use some acrylic templates I had instead of paper.

Appliqué your circles by any method you prefer.


I fused my circles in place.  As you can see, I changed my mind on the smaller circle size and varied the placement a bit.


Paulette is still trying to decide which placement she prefers.  The strip on the background fabric is made up with circles.  She has taken circles to the extreme.

I can hardly wait to see what Carol has come up with!  Have fun everyone.

Monday 4 March 2019

Rivervalley's March Block

This month's block is brought to you by Paulette.  The block is "Adori" and it comes from Kirsty's Bonjour Quilts blog.  Click HERE to go to the complete tutorial.

Kirsty uses a great approach to a log cabinish block.  Strata are created, and then cut to make the necessary log cabin pieces.  Since the blocks are 12" square, they are perfect for our quilt-along.  Just nine blocks and you have a great Preemie quilt if that is your preference.


Paulette and I have made a selection of blocks.  Any colour combination works.  You need three feature fabrics and a bit of background fabric.  We hope you give it a try.

Monday 4 February 2019

Rivervalley's February Block

This months block is brought to us by Kathy.


Paulette made two versions of the block.


These blocks show how different the block can look, depending on your fabric choice.

Have a great day!

Monday 7 January 2019

Rivervalley's January Block

This month's block is a Modern Dresden.  A traditional Dresden is made up of 18 degree wedges.  I decided to use a 15 degree wedge.  You may use whatever size you wish.


I started with a variety of scrap strips, from 2 1/2" to 3 1 /2" wide.


I added a 3 1/2" strip of background to each side of the scraps.


Next up was cutting wedges with my 15 degree ruler.


I varied where I placed the ruler so that I would get different amounts of background top and bottom. For the corners of the blocks make sure the wedge is at least 9 inches long.  You will need twenty four wedges if using the 15 degree ruler.


Lay out the wedges on a 12 1/2" ruler or on your cutting mat, making sure to cover the corners to the 12 1/2" mark.


When you are happy with your placement, start sewing together.  Sew the wedges into pairs, then six together for a quarter of the block, and the all twenty four together.  Trim the block to 12 1/2" and then add a circle of background fabric over the centre hole.

Happy stitching.


Monday 3 December 2018

Rivervalley's December Block

This months block is brought to us by Judy!


The block is a modern leaf!  To make it follow along with Judy's instructions.


Make a stroppy block 1 1/2" bigger than desired finished size.  Judy made hers 4 1/2" so that the block would finish 3".  Make a second block and cut the blocks, angling in opposite directions for each block.


Sew two mirror image pieces together with a 3/4" strip of stem fabric in the middle.  Trim the block to the desired size and add connector corners of background that are finished size plus 1/2". Judy used 2" background squares for her 3" finished block.

Judy made four leaf blocks in total so that when they are pieced together they will make a 6" finished block.


Paulette's block is very elegant.


My block is a little on the bright side.  Paulette and I both used instructions available here.  It is a blog post from a few years ago, with a link within it to the original directions for the block.

Thank you to Judy for organizing and presenting this fun block for us.

Happy Quilting!