Monday 3 December 2018

Rivervalley's December Block

This months block is brought to us by Judy!


The block is a modern leaf!  To make it follow along with Judy's instructions.


Make a stroppy block 1 1/2" bigger than desired finished size.  Judy made hers 4 1/2" so that the block would finish 3".  Make a second block and cut the blocks, angling in opposite directions for each block.


Sew two mirror image pieces together with a 3/4" strip of stem fabric in the middle.  Trim the block to the desired size and add connector corners of background that are finished size plus 1/2". Judy used 2" background squares for her 3" finished block.

Judy made four leaf blocks in total so that when they are pieced together they will make a 6" finished block.


Paulette's block is very elegant.


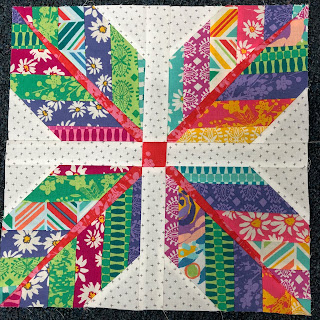
My block is a little on the bright side.  Paulette and I both used instructions available here.  It is a blog post from a few years ago, with a link within it to the original directions for the block.

Thank you to Judy for organizing and presenting this fun block for us.

Happy Quilting!

Monday 5 November 2018

Rivervalley's November Block

This months block is brought to us by Jane.  Thank You!!  As promised Jane has kept her block fairly easy.


It's a rail fence block!  To make a quarter of the block you will need three 2 1/2" x 6 1/2' pieces of different fabric.  Sew together and press as shown.  Make three more blocks and sew together to make a 12 1/2" block.


My block is a slight variation of Jane's Rail Fence.


I stripped pieced six 1 1/2" strips, and then cut four pieces 2 1/2" x 6 1/2" and substituted them into the centre strip spot.

Paulette came up with several variations on the theme.


Offsetting the centre fabric makes for a great alternative.

I have been shown a few blocks made from last months presentation.  Wonderful.  Paulette had hers ready to go in time for the meeting.  Here are her pictures.


 The machine button hole stitch with variegated thread makes for a nice finish on her block.

I'm looking forward to seeing lots of variations on this months block.  Next months block will be brought to us by Judy. 

Monday 1 October 2018

Rivervalley Quilters' Modernish Block of the Month

Rivervalley Quilters have asked for a block of the month to run for nine months, starting today. Paulette and I have agreed to head up a crew of "volunteers."

The first block is presented by Dinah.  It is her take on Hawaiian Appliqué Quilt Blocks.


My version of a Hawaiian quilt block is a little different, I'm not sure it will make the final cut for my quilt, but it certainly was fun to make.

Since all the blocks are going to be 12" finished (12 1/2"unfinished) I started designing my block with an eleven inch square piece of paper.


I folded it in half on the diagonal, and then folded twice more on the diagonal.


I drew a funky design that no way resembles the beautiful leaves Dinah came up with.


When I cut it and opened it up, it looked like an ink blot, but I decided to go ahead with it.


Since I was fusing mine, I traced it onto fusible web and then cut some of the inner fusible out. This is to make the block not quite so stiff.


I fused the web onto the back of my fabric and cut out on the lines.


I cut a thirteen inch square of background fabric and folded it on the diagonal and pressed to make some reference marks for placement of my ink blot.  After fusing the blot, I stitched 1/8" in on all edges and then trimmed the block down to 12 1/2".

Maybe my next try will be a true Hawaiian design that is reverse appliquéd like Dinah's.  Stay tuned.


Sunday 4 March 2018

Crossed Lines

Today is a tutorial day for a quick little baby quilt idea, that can also be used to make a smaller block.


This technique popped up recently on my Facebook feed.  I decided to do the math and come  up with a quilt that finished around 36 inches, for a preemie quilt.

Start with eighteen 2 1/2" strips of fabric.  Piece together end to end, and then cut into thirteen pieces that are 2 1/2" x 55".


Sew the thirteen pieces together along the length to make a piece that is approximately 26 1/2" x 55"


Cut two squares  and then cut the squares in half on the diagonal.


The bias cut edges end up on the outside of the quilt as you flip the pieces for the orientation shown.


After stitching together, I stay stitched the edges, quilted and bound this little cutie!


Next up I wanted to make a block that was 9 1/2" to fit into my (someday) Cotton + Steel quilt.

I started with seven 1 1/2" x 21" pieces cut from some fat quarters I had laying around.


The strips were sewn together to make a piece 7 1/2" x 21".  Since this was a smaller piece than above, I used Mary Ellen's Best Press on the entire piece so that I didn't have to worry as much about the bias edges. This piece was cut into two squares and then once again the squares were cut on the diagonal.


After they were sewn the block was just slightly larger than I wanted so I cut it down to 9 1/2".

Have a great day!

Friday 2 February 2018

Hoffman Digital Deer

I feel so fortunate to be able to play with new fabric, before it hits the stores.  My latest adventure is with the Hoffman Digital Deer panel.


At a recent Guild meeting Paulette presented a demo on Delectable Mountains.  I decide that the block would work well with this panel.  A little bit of math was required to make it work the way I wanted, but in the end I was happy with the effect.  The red border was a perfect match for the little cardinal in the lower right corner.


The backing is the two tone Fireside that is just arriving in stores now.


I had an opportunity to play a little with the quilting on a hanging for a friend.  I love all the textures on this!  I'm hoping she will be as happy with it as I am.

Linking up with Finish it up Friday.

Monday 15 January 2018

Crossed Paths

This block was originally used here for a Cotton + Steel quilt I had made.  After making all the blocks I had an aha moment.  More of that later, here is the block.


To  make a 12" block you need two feature fabrics and a background fabric.  From each of the feature fabrics cut two 4 3/4" blocks and one 5 7/16" block.


Cut the 5 7/16" blocks twice on the diagonal.  Sew two pieces of each colour together to make a quarter square unit that should be 4 3/4"

From the background fabric cut a 7 3/16" square and two 3 7/8" square.  Cut the larger square twice on the diagonal and the smaller squares once on the diagonal.


Lay out as shown and sew together.  The first time I made a quilt from this block I sewed separate blocks, laid them out and sewed together.  That is when I realized that there was a much easier way to make this design into a quilt.


I laid all the feature fabrics out, then cut 4 3/4" background pieces and placed them as shown.  I eliminated a lot of seams in the background for a much easier quilt to put together.  I still needed to cut the edge insets the same as the block above.  The block calls for 7 3/8" squares, but I cut mine at 7 1/2" so I would have a little wiggle room and could trim the edges after.  The corner insets were cut from 4 1/4" blocks for the same reason.  I sewed the diagonal rows together first, and then sewed all the rows together to finish the quilt.


I ended up with a 36" quilt, perfect for a baby quit or table topper.

You can use any size for your feature fabric and background pieces, adjusting the edge insets to match.


That is what I did for this Cotton + Steel piece which will end up in my quilt at some point.  I based it on a 3 1/2" cut size for the feature and background fabrics.  I purposely cut the insets quite a bit larger so that I could trim them down to a size that will work in my quilt.

Friday 12 January 2018

The Podium Bag

This year I joined the Bog of the Month club with the intention of stretching my sewing abilities.  Well, the podium bag did just that.


This is the back of the bag, showing the lovely Cotton + Steel Hedgehog fabric I decided to use.


The front view shows the Vinyl I used.  It was my first time sewing with vinyl, so there was a bit of a learning curve.  My machine did struggle a little with sewing the multiple layers on the flap portion.  I think in the future I will stick with cork of fabric for my bags.


I really do love this hedgehog fabric!  There was an option to put decorative work on the vinyl overlay, but I felt I had had enough fun working with the vinyl already.  I used batik fabric for the lining and it was a dream to work with.  Chris has a couple of great ideas in her pattern for the bag.  At the back there is a hidden pocket on the outside for your phone.  The inside includes a zipped pocket that is used to turn the entire bag right side out.  This makes for a much neater finish on the top edge of the bag.

The Bag of the Month Club is an adventure I'm sure I will enjoy!

Linking up with Finish it up Friday.

Friday 5 January 2018

Happy 2018

The years seem to coming and going much faster than they used to.  Happy New Year to all of you!

I took a bit of a break from quilting over the holidays.  I decided it was time to make myself a new bag instead.


This is my Hariet Expandable Tote from Swoon Sewing patterns.  Katja had just ordered in the pattern and it had to come home with me.


The fabric on the outside is a Linen and the expandable part is cotton, both from Cotton + Steel.  The cork is from mm cork in Trail and the hardware is of course from Emmaline.


The only thing I might do next time, is make the straps a little longer.  And yes, buy a little more ready made strapping as it wasn't that easy to make more when I realized I didn't quite have enough.  While glueing the strapping in place with Beacon Fabric-Tac, I managed to get a little extra on the bag fabric.  I dug out the nail polish remover and tested it on a scrap, and then used it to remove the excess glue.  It worked well for me, but always try it on a test piece of fabric first.


Now this is a real blast from the past.  I appliquéd the blocks many years ago.  I found a piece of year 2000 fabric in the pieced parts, so I know I pieced it together around then.  A friend saw it in my unfinished basket earlier in the year and said how much she liked it.  Well, I finished it up and gave it to her over Christmas as a hostess gift.  It isn't some of my finest work, but it is cute.

Linking up with Finish it up Friday.